Welcome to the Ultimate Guide on how to effectively remove the autorun.exe virus and safeguard your PC against autoRun infections. In this comprehensive article, we will equip you with the essential knowledge and tools to combat this persistent threat, ensuring the security and smooth operation of your computer.
Introduction to Autorun Virus
Protecting your PC from AutoRun infections is crucial to keeping your system safe from viruses and malware. The Autorun.exe virus is a common threat that can be spread through USB drives and other removable media.
To remove the Autorun.exe virus and protect your computer, follow these steps:
1. Disable the AutoPlay feature on your computer. This will prevent the virus from automatically running when you connect a USB drive or other media.
2. Use a reliable antivirus software to scan your system and remove any viruses or malware. Microsoft offers a range of products, such as Windows Security and Symantec Endpoint Protection, that can help with this.
3. Delete any Autorun.inf files that may be present on your USB drives or other media. These files are often used by the virus to execute its code.
4. Be cautious when connecting USB drives from unknown sources. Scan them for viruses before accessing any files.
By following these instructions, you can effectively remove the Autorun.exe virus and protect your PC from future infections. Stay vigilant and keep your system secure.
Detecting and Identifying an Autorun Virus
How to Detect and Identify an Autorun Virus
To effectively detect and identify an Autorun virus on your computer, follow these steps:
1. Disable the AutoPlay feature on your Windows computer to prevent the virus from automatically executing. This can be done through the Control Panel or the Group Policy Editor.
2. Use reliable antivirus software, such as Microsoft Endpoint Protection, to scan your system for any potential infections. Follow the instructions provided by the software to remove any detected viruses.
3. Be cautious when using USB drives or flash drives. Autorun viruses often spread through these devices. Always scan them with antivirus software before accessing any files.
4. Check for any suspicious files or folders on your computer. Autorun viruses often create autorun.inf files, which can be found in the root directory of an infected drive. Delete these files immediately.
5. Consider using tools like Sysinternals Autoruns to identify and disable any autorun entries in your system. This will help prevent the virus from executing upon startup.
Remember to regularly update your antivirus software and keep your operating system up to date to protect your computer from the latest threats. By following these steps, you can effectively detect and remove autorun viruses to keep your PC secure.
Removing Autorun Virus from PC or USB Drive
1. To remove the Autorun.exe virus from your PC or USB drive, follow these simple steps:
2. First, **disable the Autorun functionality** on your computer. This will prevent the virus from automatically executing when you connect a USB drive. To do this, open the Windows Security settings and disable the Autorun feature.
3. Next, **scan your PC and USB drive** using reliable antivirus software like Symantec or MiniTool. These programs will detect and remove any infections.
4. If the virus is still present, you can **manually remove the Autorun.inf file** from your USB drive. Open the drive and delete any suspicious files or folders.
5. Another effective method is to use **Sysinternals Autoruns**. This tool allows you to analyze and remove any autorun entries that may be causing the infection.
6. If you encounter any issues, such as **access denied** or **confusion**, try running the removal tools as an administrator or in safe mode.
7. Once you have successfully removed the Autorun virus, **keep your PC protected** by regularly updating your antivirus software and avoiding suspicious files or websites.
Remember, staying vigilant and taking necessary precautions will help protect your computer from autorun infections.
Creating a Duplicate Autorun.inf File
To create a duplicate Autorun.inf file, follow these steps:
1. Open a text editor, such as Notepad, on your computer.
2. Copy the contents of the original Autorun.inf file.
3. Paste the copied contents into the text editor.
4. Save the file with a different name, such as “DuplicateAutorun.inf”.
5. Make sure to save the file with the “.inf” extension.
6. Now, you have successfully created a duplicate Autorun.inf file.
By creating a duplicate file, you can experiment with changes or modifications without affecting the original file. This can be especially useful when dealing with Autorun.exe virus infections or trying to protect your PC from AutoRun infections.
Remember, always exercise caution when dealing with files related to Autorun functionality to avoid any potential vulnerabilities or confusion.
Using Command Prompt to Remove Autorun Virus
Removing the Autorun.exe virus from your PC is crucial for protecting your computer from potential infections. One effective method for removing this virus is by using the Command Prompt. Follow these steps:
1. Open the Command Prompt by pressing the Windows key + R, then typing “cmd” and pressing Enter.
2. Navigate to the root directory of the infected drive by typing the drive letter followed by a colon (e.g., “D:”) and pressing Enter.
3. Type “attrib -r -a -s -h autorun.inf” and press Enter to remove the hidden, system, and read-only attributes of the autorun.inf file.
4. Type “del autorun.inf” and press Enter to delete the autorun.inf file.
5. Type “rd /s /q recycler” and press Enter to remove the recycler folder associated with the virus.
6. Lastly, restart your computer to complete the removal process.
By using the Command Prompt, you can effectively remove the Autorun.exe virus from your PC and protect it from potential infections.
Uninstalling Suspicious Programs to Remove Autorun Virus
To uninstall suspicious programs and remove the Autorun virus from your computer, follow these steps:
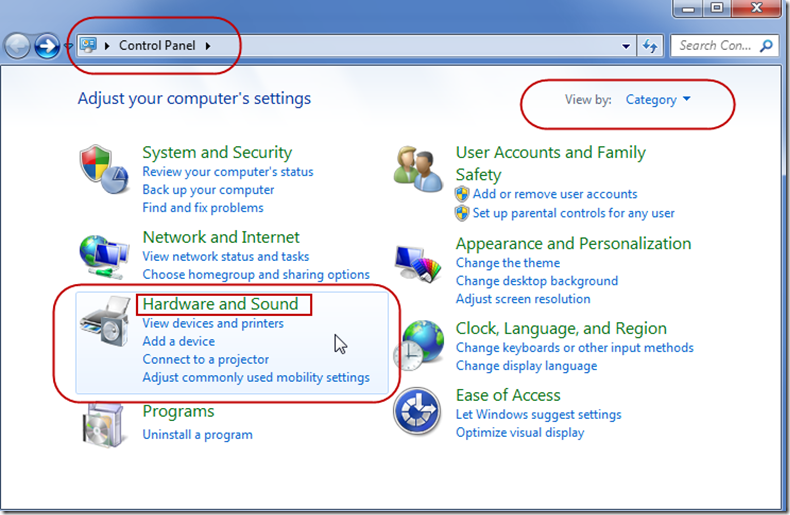
1. Open the Control Panel by clicking on the Start menu and selecting Control Panel.
2. Click on “Uninstall a program” or “Programs and Features” (depending on your version of Windows).
3. Look for any programs that you don’t recognize or that seem suspicious. Right-click on the program and select “Uninstall” to remove it from your computer.
4. If you suspect the virus may have entered your computer through a USB flash drive, make sure to safely eject any USB drives connected to your computer.
5. Run a full scan of your computer using a reliable antivirus software. Microsoft Defender Antivirus is a good option for this.
6. Once the scan is complete, follow any instructions provided by the antivirus software to remove any detected threats.
7. Restart your computer to complete the removal process.
Remember to regularly update your antivirus software and be cautious when downloading and installing programs from the internet to protect your computer from future infections.
Preventing Autorun Virus Spread through AutoRun
- Disable AutoRun feature
- Open Run dialog box by pressing Win+R
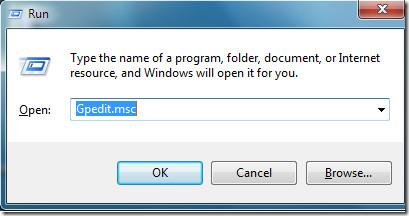
- Type gpedit.msc and press Enter
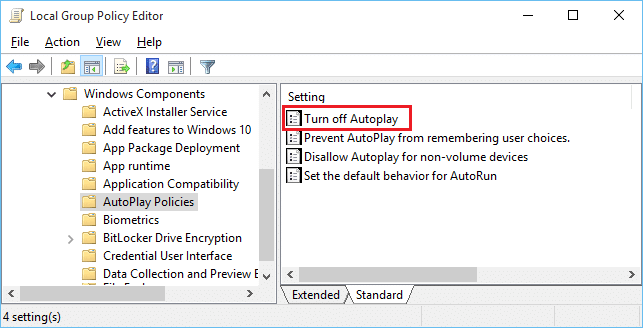
- Navigate to Computer Configuration > Administrative Templates > Windows Components > AutoPlay Policies
- Double-click on Turn off AutoPlay and select Enabled
- Click Apply and then OK
- Scan removable devices before use
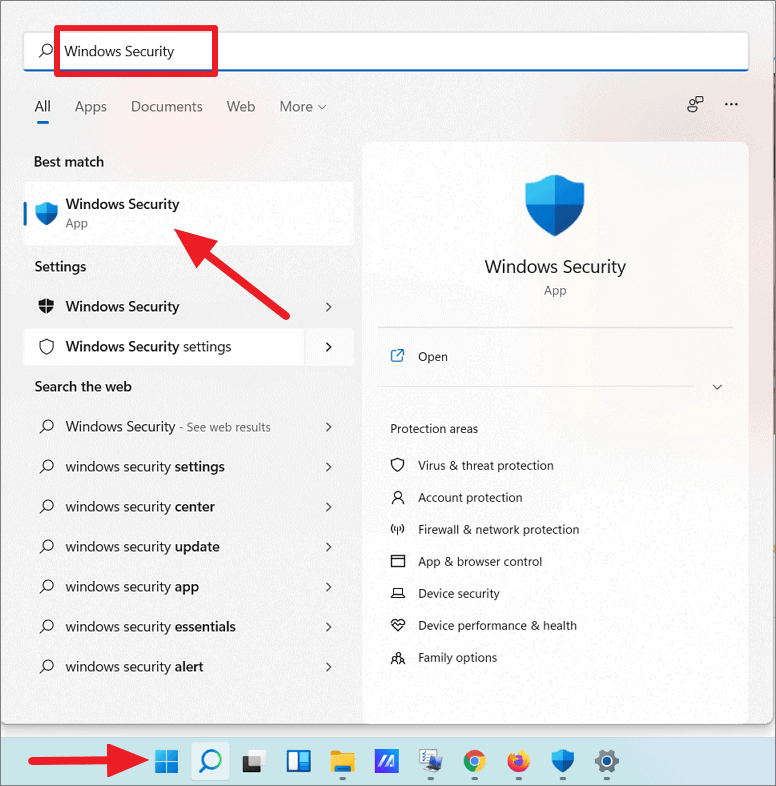
- Insert the removable device into your PC
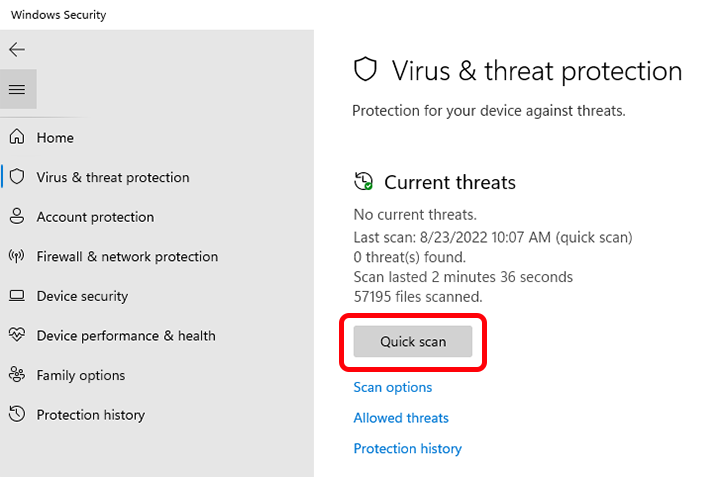
- Open Windows Security by clicking on the shield icon in the taskbar
- Select Virus & threat protection
- Click on Quick scan or Full scan to scan the device
- Follow the on-screen instructions to remove any detected viruses
- Keep your antivirus software up to date
- Open your antivirus software
- Go to the Settings or Options menu
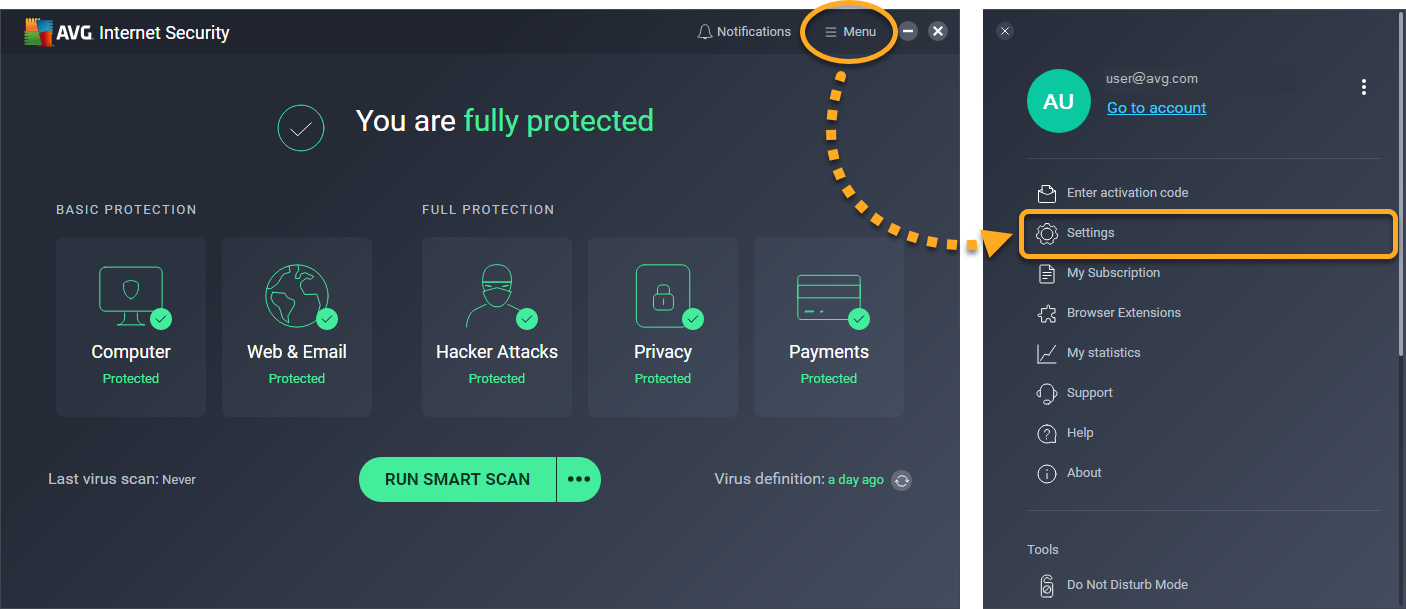
- Look for the Update or Check for updates option
- Click on it to update the antivirus software
- Wait for the update process to complete
- Avoid clicking on suspicious links or downloading unknown files
- Exercise caution while browsing the internet
- Do not click on links from untrusted sources or emails from unknown senders

- Avoid downloading files from suspicious websites
- Always verify the source and reputation of the website/file before proceeding
Bonus Tips to Avoid Autorun Virus
-
Disable AutoPlay:
- Open the Control Panel by clicking on the Start menu and selecting Control Panel.
- In the Control Panel, search for “AutoPlay” in the search box.
- Click on “AutoPlay” to open the AutoPlay settings.
- Uncheck the box that says “Use AutoPlay for all media and devices”.
- Click on Save to apply the changes.
-
Update Antivirus Software:
- Open your antivirus software by clicking on its icon in the system tray or searching for it in the Start menu.
- Click on the “Update” or “Check for updates” option to ensure your antivirus software has the latest virus definitions.
- Wait for the update process to complete.
-
Scan External Devices:
- Connect the external device (USB drive, external hard drive, etc.) to your computer.
- Open your antivirus software and select the option to scan the connected device.
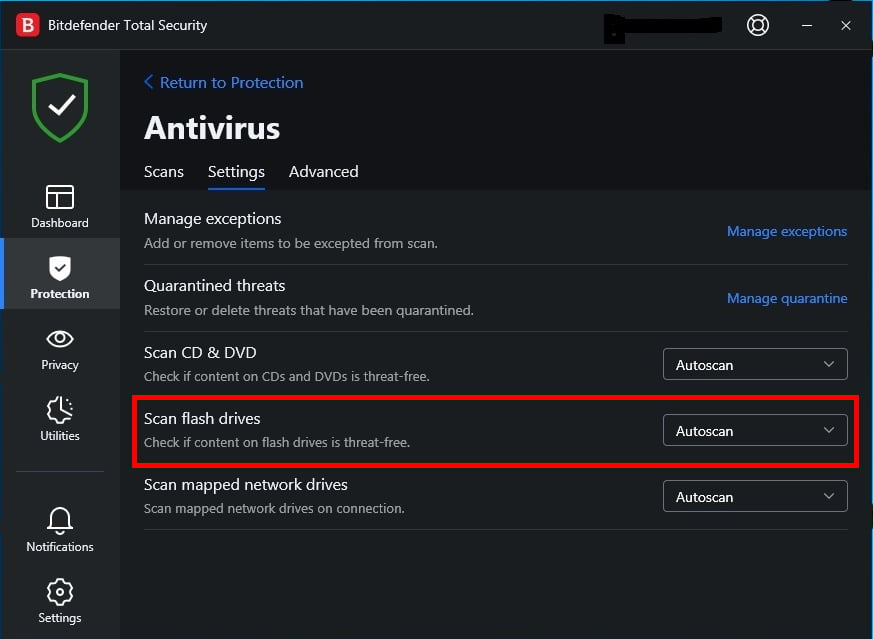
- Wait for the scan to complete and follow any prompts to remove any detected viruses or malware.
- Safely disconnect the external device from your computer.
-
Enable Firewall:
- Open the Control Panel by clicking on the Start menu and selecting Control Panel.
- In the Control Panel, search for “Firewall” in the search box.
- Click on “Windows Firewall” to open the Windows Firewall settings.
- Click on “Turn Windows Firewall on or off” in the left sidebar.
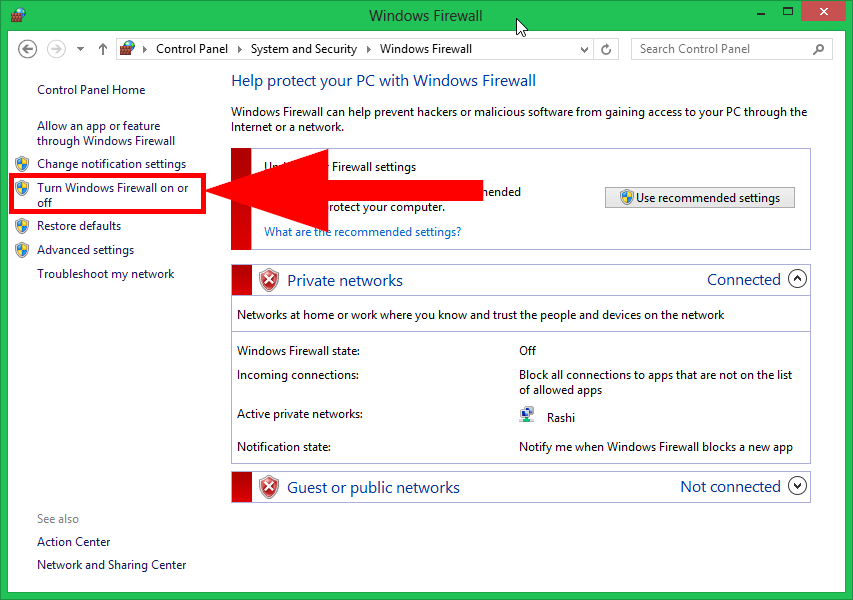
- Select the option to turn on the firewall for both private and public networks.
- Click on OK to save the changes.
-
Keep Software Updated:
- Regularly check for updates for your operating system, web browsers, and other software installed on your computer.
- Enable automatic updates if available to ensure you receive the latest security patches and bug fixes.

- Visit the official websites of the software to download and install updates manually if automatic updates are not available.
Recovering Data from an Autorun Virus Infected USB
If your USB flash drive has been infected with an autorun virus, don’t worry, you can still recover your data. Here’s how:
1. Connect the infected USB to your computer.
2. Open File Explorer and navigate to the USB drive.
3. Right-click on the USB drive and select “Properties.”
4. Go to the “Tools” tab and click on “Check” under the “Error checking” section.
5. Follow the on-screen instructions to scan and fix any errors on the USB drive.
6. Once the scan is complete, open the USB drive and look for your important files.
7. If you encounter any “access denied” errors, you can use a USB virus remover like MiniTool Power Data Recovery to recover your files.
8. Launch the USB virus remover and select the infected USB drive.
9. Click on the “Scan” button to scan for any infected files.
10. Once the scan is complete, select the files you want to recover and click on “Recover.”
Remember to always scan your USB drives for viruses before accessing them to prevent future infections.
