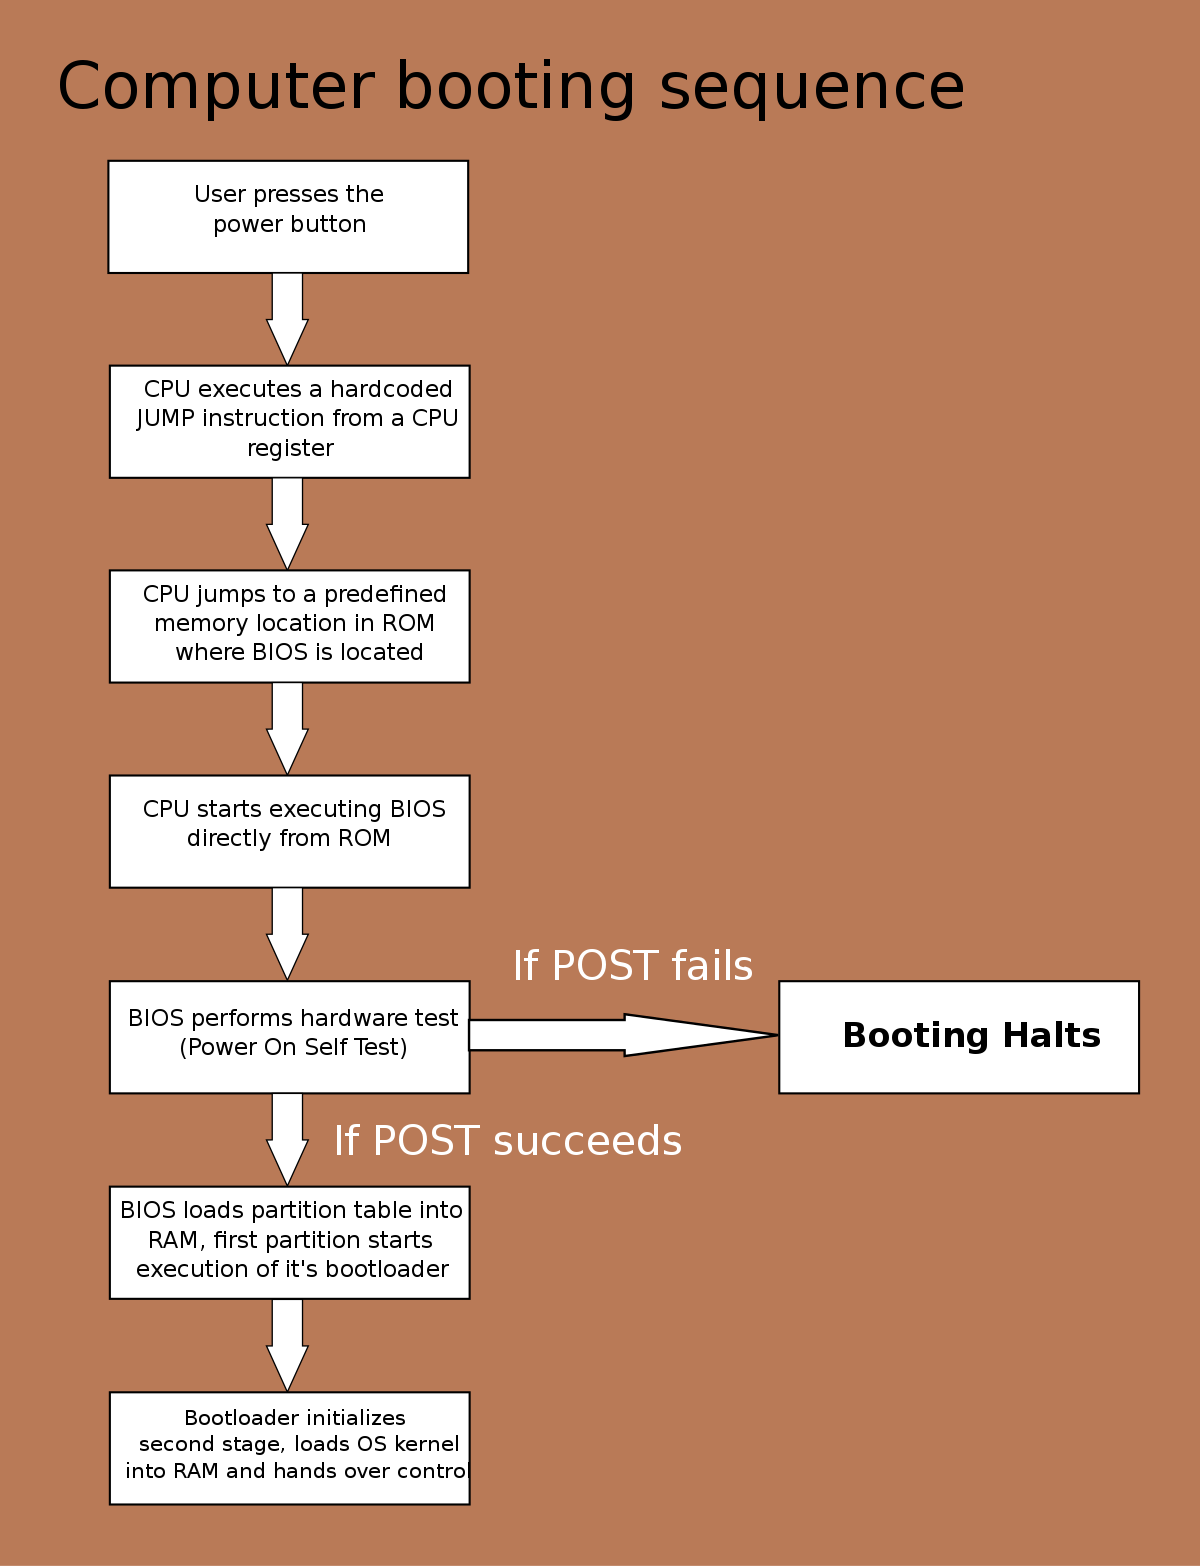
Welcome to a comprehensive guide on configuring secure boot and changing boot mode on Toshiba Satellite for UEFI. This article will navigate you through the necessary steps to ensure the security and optimal functionality of your Toshiba Satellite laptop.
Troubleshooting Toshiba Satellite Boot Issues
To troubleshoot boot issues on your Toshiba Satellite in UEFI mode, you can configure Secure Boot and change the Boot Mode. Follow these steps:
1. Restart your computer and press F2 to enter the BIOS setup utility.
2. Go to the System Configuration or Boot menu.
3. Look for the Boot Mode or CSM Boot setting. Change it to UEFI or UEFI with Legacy Support if available.
4. If you have Secure Boot enabled, you may need to disable it. Look for the Secure Boot option and set it to Disabled.
5. Save the changes and exit the BIOS setup utility.
6. Restart your computer and press F12 or F10 to access the boot menu.
7. Select the appropriate boot option for your desired operating system (e.g., Windows 10, Ubuntu) or boot from a bootable USB drive if necessary.
By configuring Secure Boot and changing the Boot Mode, you can resolve boot issues and ensure your Toshiba Satellite starts up properly. Remember to consult your user manual or Toshiba support for specific instructions related to your model.
Changing Boot Mode and Priority on Toshiba Satellite
To change the boot mode and priority on a Toshiba Satellite for UEFI, follow these steps:
1. Restart your Toshiba Satellite computer and press the F2 key to enter the BIOS firmware settings.
2. In the BIOS settings, navigate to the “System Configuration” or “Boot” menu.
3. Look for an option called “CSM Boot” or “Legacy Boot” and set it to “Enabled” if you want to use legacy BIOS mode. Set it to “Disabled” if you want to use UEFI mode.
4. Next, locate the “Boot Priority” or “Boot Order” option. Use the arrow keys to select the desired boot device and press the Enter key to move it to the top of the list.
5. Save the changes and exit the BIOS settings by pressing the F10 key.
6. Your Toshiba Satellite will now boot in the selected mode with the updated boot priority.
Note: The exact names and locations of these settings may vary depending on the Toshiba Satellite model and BIOS version. Refer to the user manual or support documentation for your specific model for further guidance.
Accessing BIOS on Toshiba Satellite Laptop
To access the BIOS on your Toshiba Satellite Laptop and configure Secure Boot or change the Boot Mode for UEFI, follow these steps:
1. Restart your laptop and press the F2 key repeatedly as soon as the Toshiba logo appears on the screen. This will take you to the BIOS firmware settings.
2. In the BIOS settings, navigate to the Security or Advanced tab. Look for an option related to Secure Boot and disable it if needed.
3. Next, go to the Boot or Boot Mode tab. Here, you can change the Boot Mode to UEFI or Legacy, depending on your requirements. Select the desired option and save the changes.
4. Restart your laptop and it will boot according to the new settings.
Please note that the specific steps and options may vary slightly depending on the model and version of your Toshiba Satellite Laptop. If you’re unsure about any particular setting, refer to the Toshiba user manual or contact Toshiba support for further assistance.
Advanced Boot Options for Toshiba Satellite
- Restart the Toshiba Satellite.
- Click on the Start button located in the bottom left corner of the screen.

- Select Power.
- Press and hold the Shift key while clicking on Restart.
- Access the Advanced Boot Options menu.
- When the Toshiba logo appears during startup, repeatedly press the F12 key until the boot menu screen appears.
- Use the Arrow keys to highlight the Advanced Boot Options item.
- Press Enter.
- Select the desired boot option.
- Use the Arrow keys to navigate the menu.
- Highlight the desired boot option, such as Safe Mode or Safe Mode with Networking.
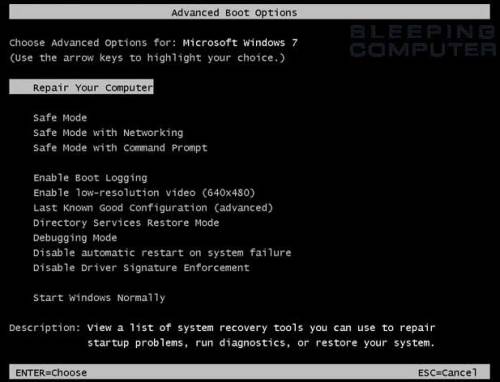
- Press Enter to select the option.
- Exit the Advanced Boot Options menu.
- Once the desired boot option has been selected, wait for the computer to start in the chosen mode.
- Once the computer has successfully booted, perform the necessary actions or troubleshooting steps.